
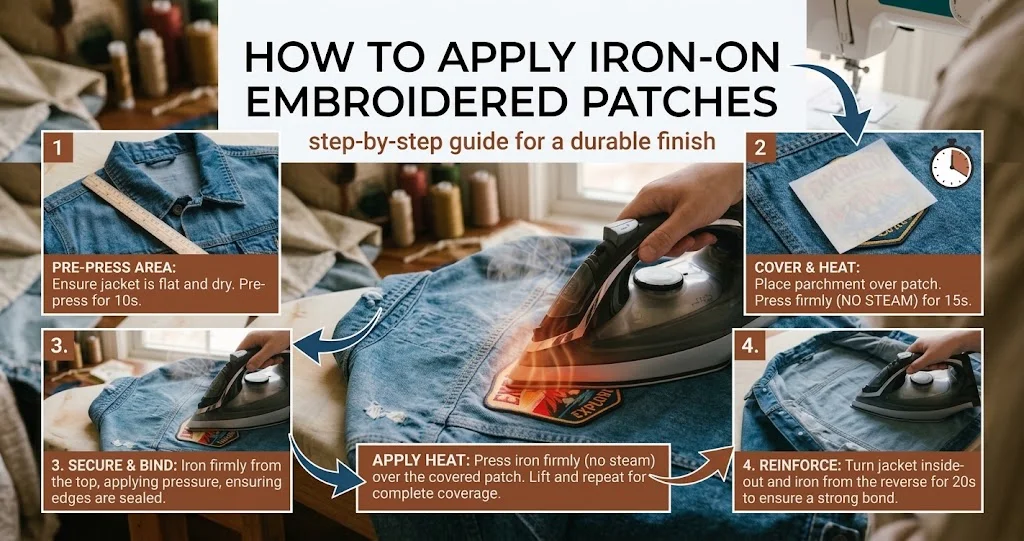
You’ve probably done this, pulled a denim jacket out of the closet, looked at it, thought “this needs a patch.” Similarly, most people have done this act.
Iron-on patches have been around significantly for exactly that reason. Quick fix for a hole, quick way to dress up something plain, no sewing machine required and picking the patch is easy.
That part’s fun, actually, however getting it to survive the first wash without curling at the corner, that’s the part people mess up.
Thus, that’s really the whole gap between a patch that’s still on your jacket in three years and one you’re re-ironing by next weekend. This is what this guide actually covers. What to grab before you start? How to stop the edges from lifting?
What are Iron-On Embroidered Patches?
These are decortive fabric patches that feature design, logos, names, artwork, that are created with stitched embroiderey. They have a heat activated adhesive baking feature that allows them to be attached to the fabric, ideally using a household iron or heat press.
This makes them a convenient option for enhancing and adding a personalised design. Also, it eliminates the need for sewing it.
For example, they display military, scouting, or organizational insignia and that is the reason why custom embroidered military patches are in demand.
Furthermore, these are based upon premium embroidery quality and create sharp detailed designs. Ensuring colour accuracy, design accessibility and overall performance.
Manufactureres that specialize in this, USA Custom Embroidered Patches, are reliable suppliers. They make significant differences to quality, durability, and appearance of the finished product.
Why do people bother with these in the first place?
- Covering up small holes, stains, or worn knees on jeans
- Personalizing jackets, backpacks, and hats
- Branding uniforms or work apparel
- Adding a name, logo, or nickname to gear
- Repairing or decorating handmade pieces like quilts and bags
What You’ll Need Before You Start?
Grab everything up front. Searching for a pressing cloth mid-iron is exactly how patches end up sitting crooked.
- A household iron (steam function turned off)
- The embroidered patch you’re applying
- The garment or item you’re attaching it to
- A thin cotton pressing cloth or a plain cotton pillowcase
- A hard, flat, heat-safe surface (an ironing board is perfect)
- Straight pins or fabric chalk for positioning
- A needle and thread (optional, for reinforcement)
- A timer or clock
How to Apply Iron-On Embroidered Patches: Step-by-Step
Step 1: Prepare the Fabric
New fabric first goes through a wash and dry cycle, which doesn’t let glue grip properly. If the border is merrowed (that’s the overlocked thread edge) on a twill backing with tight stitching, it’ll sit flatter and bond better than a patch with a raw or laser-cut edge.
The stitching keeps it from puckering up once heat hits it and if your patch has velcro or a sew-on backing mixed in for extra hold, only iron the part that’s actually meant to be ironed.
One more thing, and it’s an easy one to forget, working on a sleeve or pant leg, slide a piece of cardboard inside first. Skip it and you’ll iron the front layer straight to the back.
Step 2: Preheat the Iron
Highest setting the fabric can take, usually cotton or wool, steam off completely. Steam brings in moisture and moisture isn’t good for the glue, probably the single biggest reason patches lift later.
This step matters more than it looks like it should. Cheaper adhesive backings need sustained, dry heat to actually melt through and grip the weave underneath. As a result you end up with a patch that looks attached but peels the first time it goes through the wash.
Give the iron a minute or two before you touch anything with it, and if you’re doing a thicker patch, custom embroidered patches especially, since the dense stitching holds heat differently than a flat printed patch, lean toward the longer end of that warm-up window.
Step 3: Position the Patch
Decide where it’s going before heat’s involved and use chalk marks, or just hold it and snap a photo. It is recommended to pin the corners down first.
Take a second look at the patch itself here too. Heavily embroidered designs, the raised, textured kind, sit slightly proud of the fabric, so centering matters more visually than it does with a flat patch.
If the patch has a laser-cut edge instead of a stitched border, handle it a bit more carefully while positioning since those edges can fray if tugged.
Step 4: Cover With a Pressing Cloth
Thin cotton cloth on top protects the thread, it protects your iron, and spreads heat more evenly than pressing it right on the patch would.
This is also where you save yourself from scorched embroidery. Dense thread work, especially anything with metallic or glow-in-the-dark thread, scorches or dulls faster than plain fabric under direct iron contact, and once that happens there’s no way to fix it.
An old pillowcase or a tea towel does the job just fine as your pressing cloth. It just sits between the iron and the patch, letting the heat through where it’s needed without damaging the detail on top.
Step 5: Apply Heat and Pressure
Push down firmly and hold the iron in place. Don’t slide it around the way you’d iron a custom shirt patch. For about 20 to 30 seconds, then lift the iron, move it slightly, and press again
Pay attention because the corners get missed a lot, that’s usually where the glue is thinnest.
Bigger patches or those with heavier stitch density need this broken into more, shorter presses rather than one long press. Holding the iron in one single spot for too long can scorch the patch, while the rest of it is still not warm enough.
Step 6: Check the Bond
Let it cool for a minute, then tug gently at a corner. Any lift at all, cloth goes back on, another 15 to 20 seconds, try again. Keep doing that until it’s not budging anymore.
Pay more attention to the edges than the middle here. The middle’s usually fine, it’s the corners and border that give out first. Good adhesive can handle a lot, but that’s only true if it actually bonded all the way around in the first place.
The middle can feel completely locked in while one edge is still soft and you’d never know just from the center holding. That’s the spot that gives out two or three washes down the line. Spend the extra thirty seconds checking so that it prevents you from doing the whole thing again.
Step 7: Reinforce With Stitching
Backpacks, work jackets, anything a kid’s going to wear, these get a whip stitch around the border. Truth is, even a good custom iron-on patch bond is only step one.
Running a whip stitch around the edge, especially if there’s a merrowed border, since the needle actually has something to bite into there and you’ve basically patch-proofed it. Edges stop curling, and it stays put for years instead of a few washes.
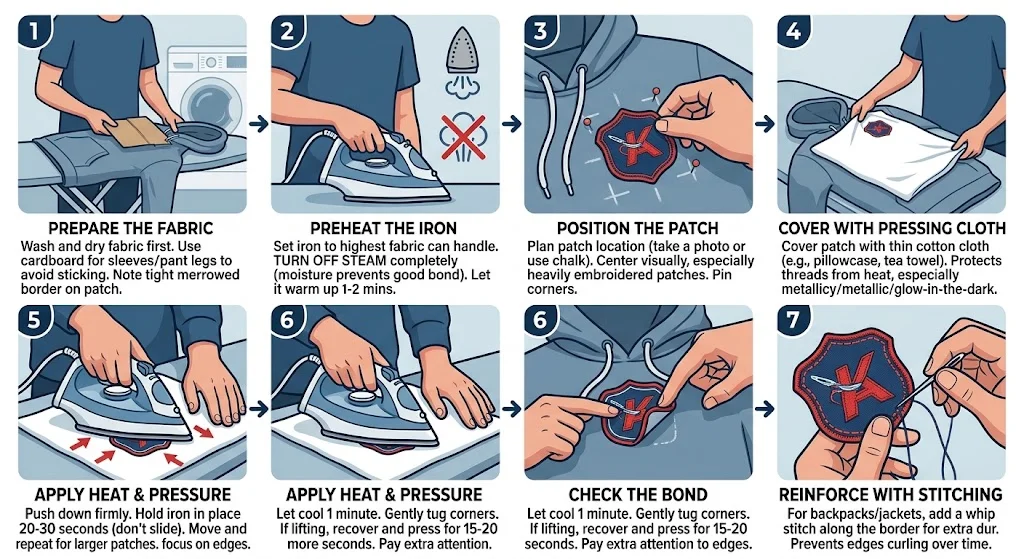
Alt text: A step-by-step visual infographic guide showing how to apply an iron-on embroidered patch onto clothing.
What Temperature and How Long Should You Iron a Patch?
The following table shows how effectively this can be managed:
| Ironing Detail | Recommended Setting | Extra Detail |
| Temperature | 280–320°F | Moderate |
| Iron Setting | Cotton or wool | Medium |
| Steam | Turn off completely | Dry |
| Pressing Time | 20–30 seconds | Steady |
| Pressing Cloth | Always use one | Protective |
| Pressure | Apply firm, even pressure | Balanced |
| Sections | Press each area separately | Thorough |
| Edges | Add extra passes if needed | Secure |
| Large Patches | Use a few extra passes | Stronger |
| Heavy Patches | Allow additional pressing | Durable |
| Checking | Inspect as you go | Careful |
| Heat Press | Follow patch-maker guidance | Specific |
| Bonding | Ensure all edges adhere | Complete |
| Fabric Safety | Avoid excessive heat | Gentle |
Tips to Keep Iron-On Patches From Falling Off
If a patch peeled after one wash, it’s almost always one of these:
- Steam was left on. Turn it off, moisture kills the bond before it sets.
- The iron got slid around. Press straight down instead.
- It got rushed. Not enough contact time is probably the biggest culprit here.
- No stitching on a high-wear spot. Elbows, knees, straps all need it.
- Worn too soon. Let it cool all the way before the fabric moves around.
- Washed right-side out. Flip it inside out first, cutting friction way down.
- Dried on high heat. Air dry or low heat keeps the bond intact longer.
Iron-On vs. Sew-On: Which Should You Choose?
Why Choose Iron-On?
Fast, no sewing skill required, works for most everyday stuff. Jacket, backpack, small hole in a pair of jeans, done in a couple minutes with just an iron.
Why Choose Sew-On?
Holds up better on things that get hammered constantly, work uniforms, gear bags, kids’ clothes. Thread just doesn’t give out the way adhesive eventually does.
Why Not Both?
Plenty of patches are made to take either method, so iron it on first, stitch around the edge after. For anything that’s going to see real use, honestly this is just the better move. Quick bond up front, stitching for the long haul.
Where Iron-On Patches Works Best?
Fabric type depicts the usage that can be suited for ironing purpose:
| Fabric Type | Works Well With Iron-On? | Materials Recommended |
| Cotton (jeans, tees) | Yes | Ideal surface; holds heat and adhesive well |
| Denim | Yes | Thick and durable, great for heavier patches |
| Canvas (bags, jackets) | Yes | Sturdy and heat-tolerant |
| Polyester blends | Caution | Can scorch or melt at high heat; use lower setting |
| Nylon | No | Melts easily; sew-on is safer |
| Leather or faux leather | No | Heat can warp or crack the material |
| Waterproof/rain gear | No | Coating can melt or lose its seal |
| Wool | Caution | Use a pressing cloth to avoid scorching |
Caring for Clothes with Iron-On Embroidered Patches
Mistakes that Weaken a Good Application
Even people who’ve done this a bunch still trip on these. A crooked patch that has to get peeled and reironed from scratch. Fabric that was never heat-safe to begin with, nylon and vinyl mostly.
Pressing hard enough in the middle but going soft on the edges, so the center holds and the border doesn’t. Forgetting the pressing cloth entirely and scorching the thread in the process, or just being impatient and washing the thing before the glue’s actually had time to cure.
Once it’s on, Washing and Drying it Right
Flip the garment inside out before it goes in the wash, that alone cuts down a lot of the friction the custom embroidered patch takes. Stick to cold or warm water rather than hot, since heat in the wash can soften the glue back up the same way an iron would.
Fabric softener’s worth keeping away from the patch area specifically, it tends to weaken the bond over time. Air drying is the safest bet, but if that’s not realistic, low heat in the dryer is fine and leave the iron alone once the patch is already down, unless you actually see it starting to lift somewhere.
Frequently Asked Questions
Can you iron on embroidered patches to any fabric?
No, cotton, denim, canvas are all fine to get ironed but nylon, leather, and waterproof stuff should not be ironed entirely.
How long do you iron a patch for it to stick?
Roughly 20 to 30 seconds of firm pressure per section, checking the edges before you’re done.
What temperature should the iron be set to for iron-on patches?
Set your iron to around 280–320°F temperature setting and make sure steam function is turned off.
How do I keep an iron-on patch from falling off?
Firm pressure, no steam, full cooldown, and stitch the border if you want it to really last longer.
Can I iron-on a patch over an old, worn-out patch?
Yes you can, pull the old one off first and clean the spot. The fresh glue needs bare fabric, not old residue underneath it.
Do iron-on patches work on hats?
Yes, as long as it’s cotton twill or something similarly heat-safe. Go slow around the curve.
Is a pressing cloth really necessary?
Yes, it keeps the thread from scorching and spreads the heat more evenly than the iron alone.
Can I use a hair straightener instead of an iron?
No, a real iron is recommended as it is more reliable.
Should I wash the garment before or after applying the patch?
You should wash it before as it gets rid of the finishing chemicals that interfere with the glue.
Can iron-on patches be removed later?
Yes, reheat it and peel slowly. There’s a decent chance some glue residue sticks around after.
Ready to Patch It Up?
None of this is complicated. Heat, steady pressure, enough time for the glue to actually grab hold. That’s most of the job right there.
Doesn’t matter if it’s a hole in your jeans, a stack of work jackets, or a backpack you’re tired of looking at, these steps are what keep the patch on for good instead of coming loose in a month.
If you’re still deciding where to buy patches from, going with a specialist like USA Custom Embroidered Patches is the most reliable option to choose. Well-made ones, tight stitching, solid glue, are a lot less of a headache than the cheap alternatives.

Emma Carter